How to secure the internet side of your Citrix Netscaler

This is a two-minute guide to securify the internet side of your Netscaler. We will setup two parameters, the “Deny SSL Renegotiation” and the acceptable Ciphers.

A. Deny SSL Renegotiation

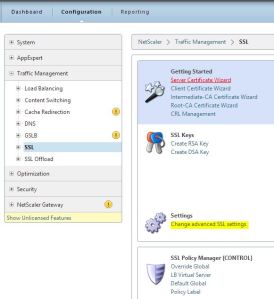
Go to Traffic Management – SSL page on your netscaler and press the “Change Advanced SSL Settings” link.

Change advanced SSL Settings

Change advanced SSL Settings

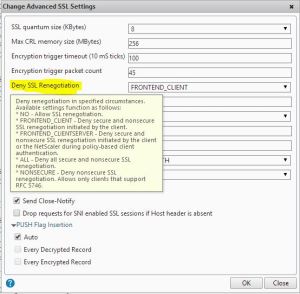
The advanced SSL settings will appear. Notice that the default value of “Deny SSL Renegotiation” property is “NO”. Change it to “FRONTEND_CLIENT”.

Deny SSL Renegotiation

Deny SSL Renegotiation

You may want to change it to the strict value “ALL” depending on your web farm structure. This setting is usually a finding after a penetration test, so set it up to avoid SSL Renegotiation Denial of Service attacks.

B. Configure the Cipher Group

Go to the SSL tab in your virtual server and select Ciphers. The configured Cipher Group is called “DEFAULT” and includes 128bit strength ciphers. Remove this value and in the available Cipher Groups pane, select “HIGH”. This group includes high strength 168bit encryption ciphers. The available ciphers pane lists the acceptable ciphers of the selected group.

All modern browser are compatible with these ciphers, so go ahead and use them.

Cipher Groups

Cipher Groups

Do the same for all your virtual servers.

Configure SPDY Protocol on Citrix Netscaler ADC 10.1

Configuring SPDY protocol on Netscaler is pretty straightforward. Ensure that you have upgraded Netscaler device or virtual appliance to the latest version, currently 10.1. SPDY requires SSL, so an SSL Certificate should be obtained from a Certification Authority and you may want to SSL offload your website as well.

To configure SPDY, login to the console and goto System – Profiles, select the HTTP Profiles tab on the right pane. Press the Add button to create a new profile or select an existing one. For example let’s create a new profile called Http-SPDY profile. Check out all the needed options and finally the SPDY checkbox.

SPDY Profile

SPDY Profile

Press OK to save the new profile and goto Configuration – Traffic Management – SSL Offload – Virtual Servers. Double click your virtual server and select the Profiles tab.

Virtual Server HTTP Profile

Virtual Server HTTP Profile

At the SSL Profile option select the previously created profile. Press OK and you are done. Your website is now SPDY enabled.

Of course, in real world nothing is easy! For example, when your website uses Microsoft’s Windows Communication Foundation (WCF) architecture, you must create rewrite rules on your Netscaler to replace http requests to https. By enabling SPDY, the website gets into a redirection loop and the session shuts down!

Chrome Redirection Loop

Chrome Redirection Loop

Firefox Redirection Loop

Firefox Redirection Loop

I haven’t find a workaround for this problem. Any help is appreciated!

Citrix Netscaler 10.1 as a SPDY Proxy

At the end of May, Citrix announced version 10.1 of its Netscaler ADC. One of the new features is the support of Google’s SPDY v2 open protocol for any backend loadbalanced website (v3 is on the way). SPDY is like HTTP protocol with enchancements to reduce web page loading time, meaning faster Internet communication.

SPDY modifies the the way HTTP handles requests and responses. It uses compression, multiplexing and prioritarization to reduce the load latency. By multiplexing and prioritarizing the web objects of a page, only one connection is required. By compressing and deduplicating the headers the packet overhead size is reduced. A 30% to 60% performance improvement can be achieved by using SPDY.

Popular web browsers like Chrome, Firefox and Opera implement already this protocol and many heavy load websites have adopted his technology, like Google, Twitter, Facebook and WordPress to name a few. SPDY actually sits on HTTP layer, so the web applications on the datacenter do not need to be changed.  Now, even the web servers may remain intact since Netscaler’s SPDY proxy handles the SPDY client-server communication and translates it to HTTP for the backend servers.

You can check which websites use SPDY on a Chrome browser by typing

chrome://net-internals

at the URL address.

So, upgrade your Netscaler and enable the SPDY feature. More on this soon!

Citrix Netscaler Software upgrade to the latest version

Citrix NetScaler provides a complete web application load balancing, acceleration, security and offload feature set in a simple virtual appliance or a physical device. Let’s see how to upgrade it to the latest version. The following procedure took place on a virtual appliance.

Goto Citrix website and click the downloads menu. Select Netscaler ADC as a product, Firmware type and press the Find button.

Netscaler firmware

Netscaler firmware

The latest firmware release will appear at the top of the page. Click the Release link, in our case Release 10 Build 75.7 and at the bottom of the new page click the Download button.

Download Netscaler's Firmware

Download Netscaler’s Firmware

Save the downloaded compressed file in a folder, and download the related documentation at the Related Resources Section, named NS Documentation 10 Build 75.7 in our case. Save it in the same folder.

Netscaler's Upgrade Files

Netscaler’s Upgrade Files

Next login into Netscaler GUI and goto the System Information. At the bottom of the right pane, click the Upgrade Wizard.
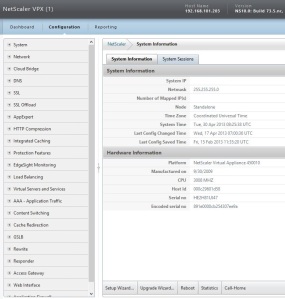
System Information

System Information

Click the Next button.

Upgrade Wizard - Introduction

Upgrade Wizard – Introduction

Then select the Upload Software and Documentation from the Local Computer.

Upgrade Wizard - Upload Software

Upgrade Wizard – Upload Software

Upgrade Wizard - Upload Documentation

Upgrade Wizard – Upload Documentation

Select the Reboot after successful installation checkbox and press Next and Finish.

Upgrade Wizard - Reboot

Upgrade Wizard – Reboot

Upgrade Wizard - Summary

Upgrade Wizard – Summary

The upgrade procedure will start by downloading and installing the files.

Netscaler's Upgrade

Netscaler’s Upgrade

A shell display console will appear during the installation with the following code

shell
Copyright (c) 1992-2008 The FreeBSD Project.
Copyright (c) 1979, 1980, 1983, 1986, 1988, 1989, 1991, 1992, 1993, 1994
The Regents of the University of California. All rights reserved.

root@ns# cd /var/nsinstall/10.0.75.7.nc/
root@ns# tar xvfz /var/nsinstall/10.0.75.7.nc/build-10.0-75.7_nc.tgz
.ns.version
ns-10.0-75.7.gz
ns-10.0-75.7.md5
installns
nsconfig
bootloader.tgz
help.tgz
CitrixNetScalerManagementPackV2.msi
ns-callhome-taas.cert
Citrix_Access_Gateway.dmg
macversion.txt
apidoc.tgz
NSConfig.wsdl
NSStat.wsdl
ns-10.0-75.7-gui.tar
ns-10.0-75.7-nitro-java.tgz
ns-10.0-75.7-nitro-csharp.tgz
ns-10.0-75.7-nitro-rest.tgz
vmware-tools.tgz
nslw.bin.tgz
root@ns# ./installns -G   -y

installns version (10.0-75.7) kernel (ns-10.0-75.7.gz)

The Netscaler version 10.0-75.7 checksum file is located on
http://www.mycitrix.com under Support > Downloads > Citrix NetScaler.
Select the Release 10.0-75.7 link and expand the "Show Documentation" link
to view the MD5 checksum file for build 10.0-75.7.

There may be a pause of up to 3 minutes while data is written to the flash.
Do not interrupt the installation process once it has begun.

Installation will proceed in 5 seconds, CTRL-C to abort
Installation is starting ...

CallHome is currently disabled. This is a new feature in 10.x that would
let this NetScaler device automatically alert Citrix support on detecting
critical errors and/or potential failures, before it impacts your network.
You can also configure this feature anytime with "enable feature ch" CLI
command or through GUI. Please see the documentation for further details.

If you enable this feature, please save the configuration after    reboot.

Do you want to enable it NOW? [Y/N] N
Copying ns-10.0-75.7.gz to /flash/ns-10.0-75.7.gz ...
...............................................
Installing documentation...
Installing XML API documentation...
Installing NSConfig.wsdl...
Installing NSStat.wsdl...
Installing online help...
Installing SCOM Management Pack...
Installing GUI...
Installing Mac binary and Mac version file...
Installing NITRO...
Installing Call Home TAAS certificate ...
Installing nslw...
Creating after upgrade script ...
Rebooting ...

Now your Netscaler is upgraded to the latest firmware.